
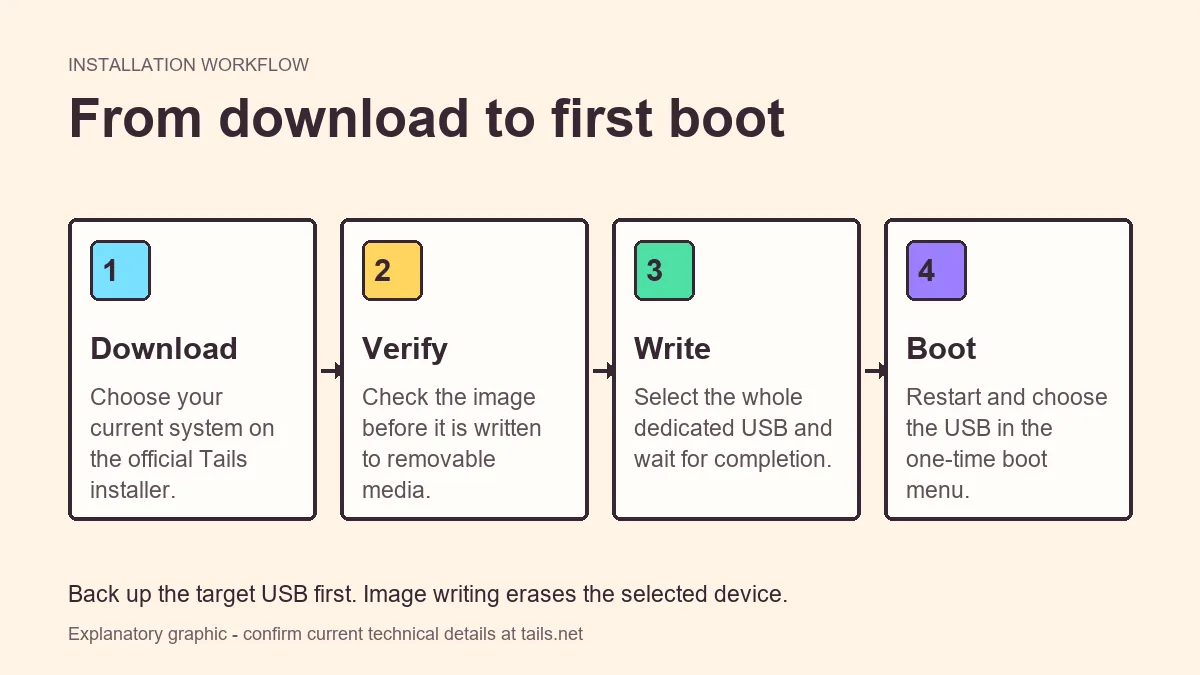
For a normal Tails OS USB setup, use the official USB image workflow for Windows, macOS, or Linux. Back up the USB first, verify the download, confirm the device has enough usable capacity, write the image to the whole stick, then restart and select that USB from the computer's boot menu.
USB image or ISO: which one belongs on the stick?
The official USB image is designed for the standard bootable USB workflow. It contains the disk layout Tails expects and is the clearest choice when the goal is to carry Tails on removable storage.
An ISO is useful for a virtual machine, DVD, or a documented advanced workflow. Renaming an ISO, copying it as a normal file, or extracting it onto a USB does not create the expected bootable device.
- Choose the USB image for the usual Tails USB stick.
- Choose ISO only when the official instructions or your VM workflow request it.
- Do not download from a mirror that cannot be traced back to the Tails Project.
Image-writing tools overwrite the selected drive. Disconnect spare external disks and confirm the USB capacity and device name before you click Write.
Before writing the Tails USB
Set aside a USB drive for Tails and copy off every file you want to keep. The write process replaces the drive's existing partition layout, so dragging files to another folder on the same USB is not a backup.
Check the current official capacity requirement instead of trusting a drive's advertised number. A device described as 7.49 GB may expose less usable space, so use a larger dedicated USB if the installer or current instructions require it. Keep the official instructions open on another device so you can compare filenames and identify the correct startup key after the computer restarts.
- Back up the USB to a different drive or cloud location.
- Use a stable internet connection for the image download.
- Confirm that your computer meets the current system requirements and USB capacity requirement.
- Have administrator permission for the image-writing tool.
How to create a bootable Tails USB
The exact writing tool varies by your current operating system, but the safe sequence is consistent. Follow the official platform-specific instructions rather than substituting a random ISO utility.
- 1
Choose your current operating system
Open the official Tails installer and select Windows, macOS, or Linux. This determines the image-writing and verification instructions.
- 2
Download and verify the image
Download the file from the official source and complete the verification method offered on that page before writing it.
- 3
Select the USB device
Open the recommended writing tool, choose the downloaded image, and verify the target device name and capacity.
- 4
Write and wait for completion
Do not remove the USB while data is being written or verified. A progress bar can pause while buffers are flushed.
- 5
Restart and open the boot menu
Leave the USB connected, restart the computer, and use its one-time boot key to select the removable drive.
What success looks like
A successful write can make the USB appear unusual in Windows or macOS because Tails uses partitions those systems do not normally mount. That alone does not mean the USB is damaged.
When the computer boots from the device, you should reach the Tails startup and welcome flow rather than returning directly to the installed operating system. If the USB is missing from the boot menu or a computer says it cannot find a bootable device, try a direct USB port, check the one-time boot key, and confirm that the image was written to the whole device rather than copied as a normal file.
- The writing tool reports completion without an error.
- The device appears in the firmware or one-time boot menu.
- The Tails welcome screen loads after selecting the USB.
Common USB setup mistakes
Most failures happen before Tails itself starts. The common causes are selecting the wrong file type, copying the image as an ordinary file, interrupting the write, choosing the wrong device, or letting the computer ignore removable media at startup.
- If the writer cannot open the file, download it again and verify it.
- If the USB is not listed at boot, try a direct USB port instead of a hub.
- If the computer starts its normal system, reopen the one-time boot menu and select the USB explicitly.
- If the drive must be reused later, follow the format and repartition process rather than deleting visible files.
A bootable USB does not make every activity anonymous. Tails routes supported network traffic through Tor, but user behavior, accounts, documents, firmware, and external services still matter.
Maintain a dependable Tails USB
A USB that worked once should still be tested before travel, reporting, research, or another time-sensitive task. Start it on the actual computer, confirm the display and network, and review any update notice. Hardware firmware updates can also change external-boot behavior, so a previous success is useful evidence but not a permanent guarantee.
Keep important Persistent Storage data backed up through the current official process. Flash memory wears out, small drives are easy to lose, and a damaged partition can make the device unavailable without warning. A second independently verified USB is more useful than two copies produced from the same unverified image.
When the Tails Project publishes a new release, use the official update path or installation guidance. Do not download a file with a familiar-looking version name from a forum, file host, or search advertisement. After updating, perform a clean restart and confirm that the displayed version and core hardware behavior are expected.
- Test before a time-sensitive use.
- Keep a separate backup of important persistent data.
- Review official security and release announcements.
- Replace unreliable or unusually slow flash media.
- Re-verify a fresh image when rebuilding the drive.
Keep your Tails OS USB ready for the next boot
A Tails OS USB should be treated as maintained boot media, not as a file you write once and forget. Before an important session, start the Tails OS USB on the exact computer you plan to use, confirm that the welcome screen appears, and test the display, keyboard, network adapter, and direct USB port. This short check catches a worn drive, changed firmware setting, or hardware regression while another computer and network are still available.
Store the Tails OS USB separately from ordinary flash drives and label it without exposing sensitive context. Do not keep the only backup of Persistent Storage on the same Tails OS USB. If the device is lost, damaged, or corrupted, a separate encrypted backup and a second verified installer provide a cleaner recovery path than attempting an emergency repair.
When a new release is announced, compare the update instructions on tails.net with the version shown by the running system. Rebuild or update the Tails OS USB through the documented official method, then complete a cold boot. Avoid third-party images that merely use a current-looking filename; source and verification matter more than the label.
- Boot-test the Tails OS USB before time-sensitive work.
- Keep persistent data backed up outside the boot drive.
- Use current official update and verification instructions.
- Replace flash media that becomes slow, unstable, or unreadable.
Tails OS USB FAQ
Can I copy the Tails image onto a USB like a normal file?
No. Use the image-writing process in the official instructions so the USB receives the required bootable layout.
How do I run Tails OS from a USB stick?
Download and verify the official image, write it to the whole dedicated USB, leave it connected, restart the computer, and choose the removable device from the one-time boot menu.
Can a 7.49 GB USB run Tails OS?
Do not rely on the advertised number alone. Check the current official capacity requirement and the usable size reported by the writing tool; use a larger USB if the device is below the requirement or the installer rejects it.
Why does my USB look smaller or unreadable after installing Tails?
The Tails partition layout can look unfamiliar to the current operating system. Test whether it boots before assuming the device failed.
Can I keep normal files beside Tails?
Use Tails Persistent Storage for supported persistent data. Do not manually resize or rearrange the Tails partitions unless the official documentation tells you to.
Does Rufus install Tails correctly?
Use the image-writing tool and method currently recommended by the official Tails instructions for your platform. Third-party settings can change and may not match the current image format.
Technical facts and downloads should be confirmed against the official Tails documentation. This independent guide does not host or modify Tails images.